Getting Started with Your C15 Mini Printer
The C15 is a compact, child-friendly portable printer designed to bring digital printing into creative play. This comprehensive guide will walk you through everything you need to know to start printing within minutes.
Download Original Manual (PDF)
Before You Begin: Important Safety Information
Battery Care and Charging
Your printer comes equipped with a rechargeable battery that requires proper care to ensure longevity and safe operation:
- Use the Correct Charger: Only charge using the official 5V charger included with your device. Using incompatible chargers may cause permanent damage to the battery and device.
- Avoid Disassembly: Never attempt to disassemble the battery or printer. This poses serious safety risks.
- Prevent Physical Damage: Do not subject the battery to impact, crushing, or extreme pressure. Keep the printer away from open flames.
- Watch for Swelling: If you notice the battery becoming visibly swollen or distorted, discontinue use immediately and do not attempt to charge it further.
- Handle Used Batteries Responsibly: Dispose of old batteries according to local recycling guidelines.
Safe Operating Conditions
Protect your printer from environmental hazards:
- Avoid Moisture-Rich Environments: Do not use or charge your printer in bathrooms, steam rooms, saunas, or any area with high humidity.
- Keep Away from Heat: Avoid high-temperature environments and never leave your printer in direct sunlight.
- Prevent Overheating: Poor charging habits can damage the print head, which is the most critical component. Always use the proper charger.
- Be Cautious of Hot Surfaces: The print head becomes hot during operation. Never touch it while printing or immediately after use.
- Mind the Cutter: The paper tear blade is razor-sharp. Exercise care when handling or replacing paper.
Initial Setup: First-Time Activation
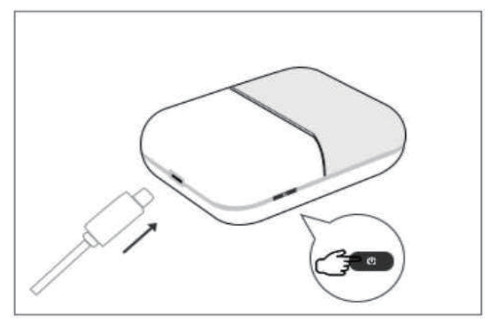
Step 1: Charge Your Device
Before first use, your printer needs to be fully charged:
- Connect the charging cable to the USB port on your device
- Plug the charger into a standard power outlet
- Allow the device to charge completely (typically 2-3 hours)
- Once fully charged, gently disconnect the cable by pulling steadily without applying excessive force
Step 2: Power On
To activate your printer:
- Locate the power button on your device
- Press and hold the power button for approximately 3 seconds
- The device will boot up and display its startup sequence
Step 3: Install the Companion App
Your printer connects to smartphones and tablets through the dedicated Fun Print mobile application:
- For iPhone Users: Open the Apple App Store and search for “Fun Print”
- For Android Users: Open Google Play Store and search for “Fun Print”
- Alternatively, scan the QR code included in your manual to download the app directly

You can also access the app at: https://www.pgyer.com/UNhf
Step 4: Connect and Test
Once the app is installed:
- Open the FunPrint app and go to “Me” → “Connect”
- Select your printer from the available device list
- You’re now ready to begin printing your creations
Important: When you open the app for the first time, tap “Allow” for all the permissions the app requests — otherwise, it may cause Bluetooth connection issues or prevent printing.
Note: The C15 can only connect to one app at a time. If FunPrint is connected in the background, other compatible apps (such as iBleem or Dolewa) will not be able to detect the printer. To switch apps, disconnect from FunPrint first, fully close it, then open the other app.
Understanding Your Printer’s Controls and Ports
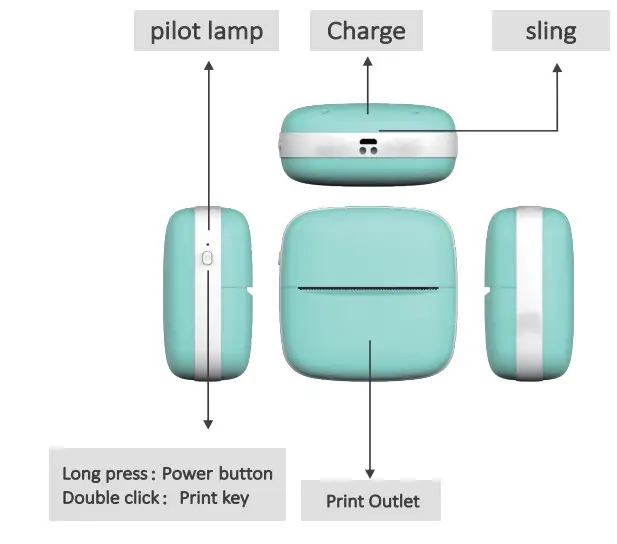
The interface includes:
- Power Button: Control device startup and shutdown
- Charging Port: USB connection point for battery charging
- Paper Compartment: Where thermal paper loads and feeds
- Status Indicator: Light that shows battery level and connection status
Working with Thermal Paper: Loading and Replacement
Preparing Your Paper
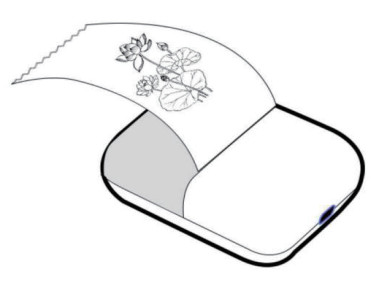
Your C15 uses thermal paper rolls that are specially treated to create images when heated by the printer’s print head.
Installing a New Paper Roll
Follow these steps to load or replace your paper:
-
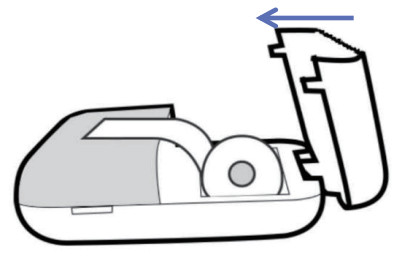
Open the paper compartment on the back or side of the device (depending on your specific model)
-
Insert the new paper roll following the directional arrow guides inside the compartment. Ensure the paper enters straight and level—do not insert at an angle, as this can cause paper jams and affect print quality
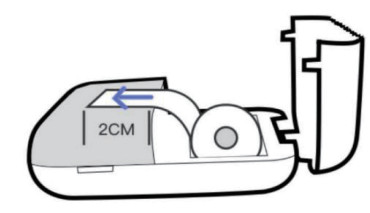
- Expose the paper properly: Pull out approximately 2 centimeters (about 0.8 inches) of paper from the roll. This exposed edge allows the auto-feed mechanism to grip and advance the paper during operation
- Secure the compartment: Close and latch the paper compartment door. The printer’s automatic paper detection system will sense the paper and be ready for printing
Tips for Paper Handling
- Always ensure paper is straight during insertion to prevent creasing or jamming
- Keep thermal paper protected from direct sunlight, heat, and moisture, as these can affect image quality
- Store unused paper rolls in a cool, dry location
- Once a paper roll is partially used, keep the compartment closed to prevent dust from affecting the print head
Troubleshooting Common Issues
Device Won’t Turn On
- Ensure the device has been fully charged by connecting it to the power adapter
- Press and hold the power button for the full 3 seconds
- Check that the charging port connection is secure and clean
Print Quality Issues
- If prints appear faded or uneven:
- Thermal paper quality is often the main factor — low-quality paper can cause faded images, uneven darkness, and short image lifespan
- Ensure you’re using genuine, high-quality thermal paper
- Check that the paper is inserted straight, not crooked
- Verify the print head hasn’t been touched or contaminated
- Try a fresh paper roll to rule out paper defects
- Adjust the print darkness setting in the FunPrint app
Connection Problems
- Make sure the Fun Print app is updated to the latest version
- Disable and re-enable Bluetooth on your device
- Restart the printer and try reconnecting
- Check that your device is within Bluetooth range (typically 10-15 meters)
Paper Feed Issues
- Verify that at least 2cm of paper is exposed from the roll
- Ensure the paper is inserted straight and not twisted
- Make sure the paper compartment is fully closed and latched
- Clean any debris from the paper path
Maintenance and Care
Regular Cleaning
- Periodically wipe the exterior with a soft, dry cloth
- Never submerge the device in water
- If moisture gets inside, allow it to air-dry completely before attempting to use
Print Head Care
- Never touch the print head directly
- Avoid using harsh chemicals or abrasive materials
- If the head seems dirty or blocked, gently wipe with a soft, dry, lint-free cloth
Storage
- Store in a cool, dry environment when not in use
- Keep away from dust and direct sunlight
- Store at room temperature to preserve battery longevity
Maximizing Your Printing Experience
The C15 Mini Printer is designed for creative expression and imaginative play. With proper setup and care, it will provide reliable performance for your printing projects. Remember to always refer to this guide when questions arise, and don’t hesitate to consult the official support channels if you encounter persistent issues.
Happy printing!